Deploying Ottehr
Deploying Ottehr takes about 30 minutes, and involves three steps:
- Configure your local Ottehr AWS profile
- Set up your Oystehr Project
- Run the deploy script
If you want to experiment with Ottehr but don't want to deploy it, follow the steps in the Ottehr readme (opens in a new tab) to set it up on your computer.
Deploying
Configure your local Ottehr AWS profile
- If you do not have an AWS account, create one (opens in a new tab)
- Install the AWS CLI (opens in a new tab) by running the following command in your terminal:
npm install -g aws-cdk - Navigate to AWS IAM (opens in a new tab)
- Click
Usersin the left-hand menu - Click
Create User - Enter a name for the user and click
Next - Click
Attach policies directly - Search for
AdministratorAccess, select it, clickNext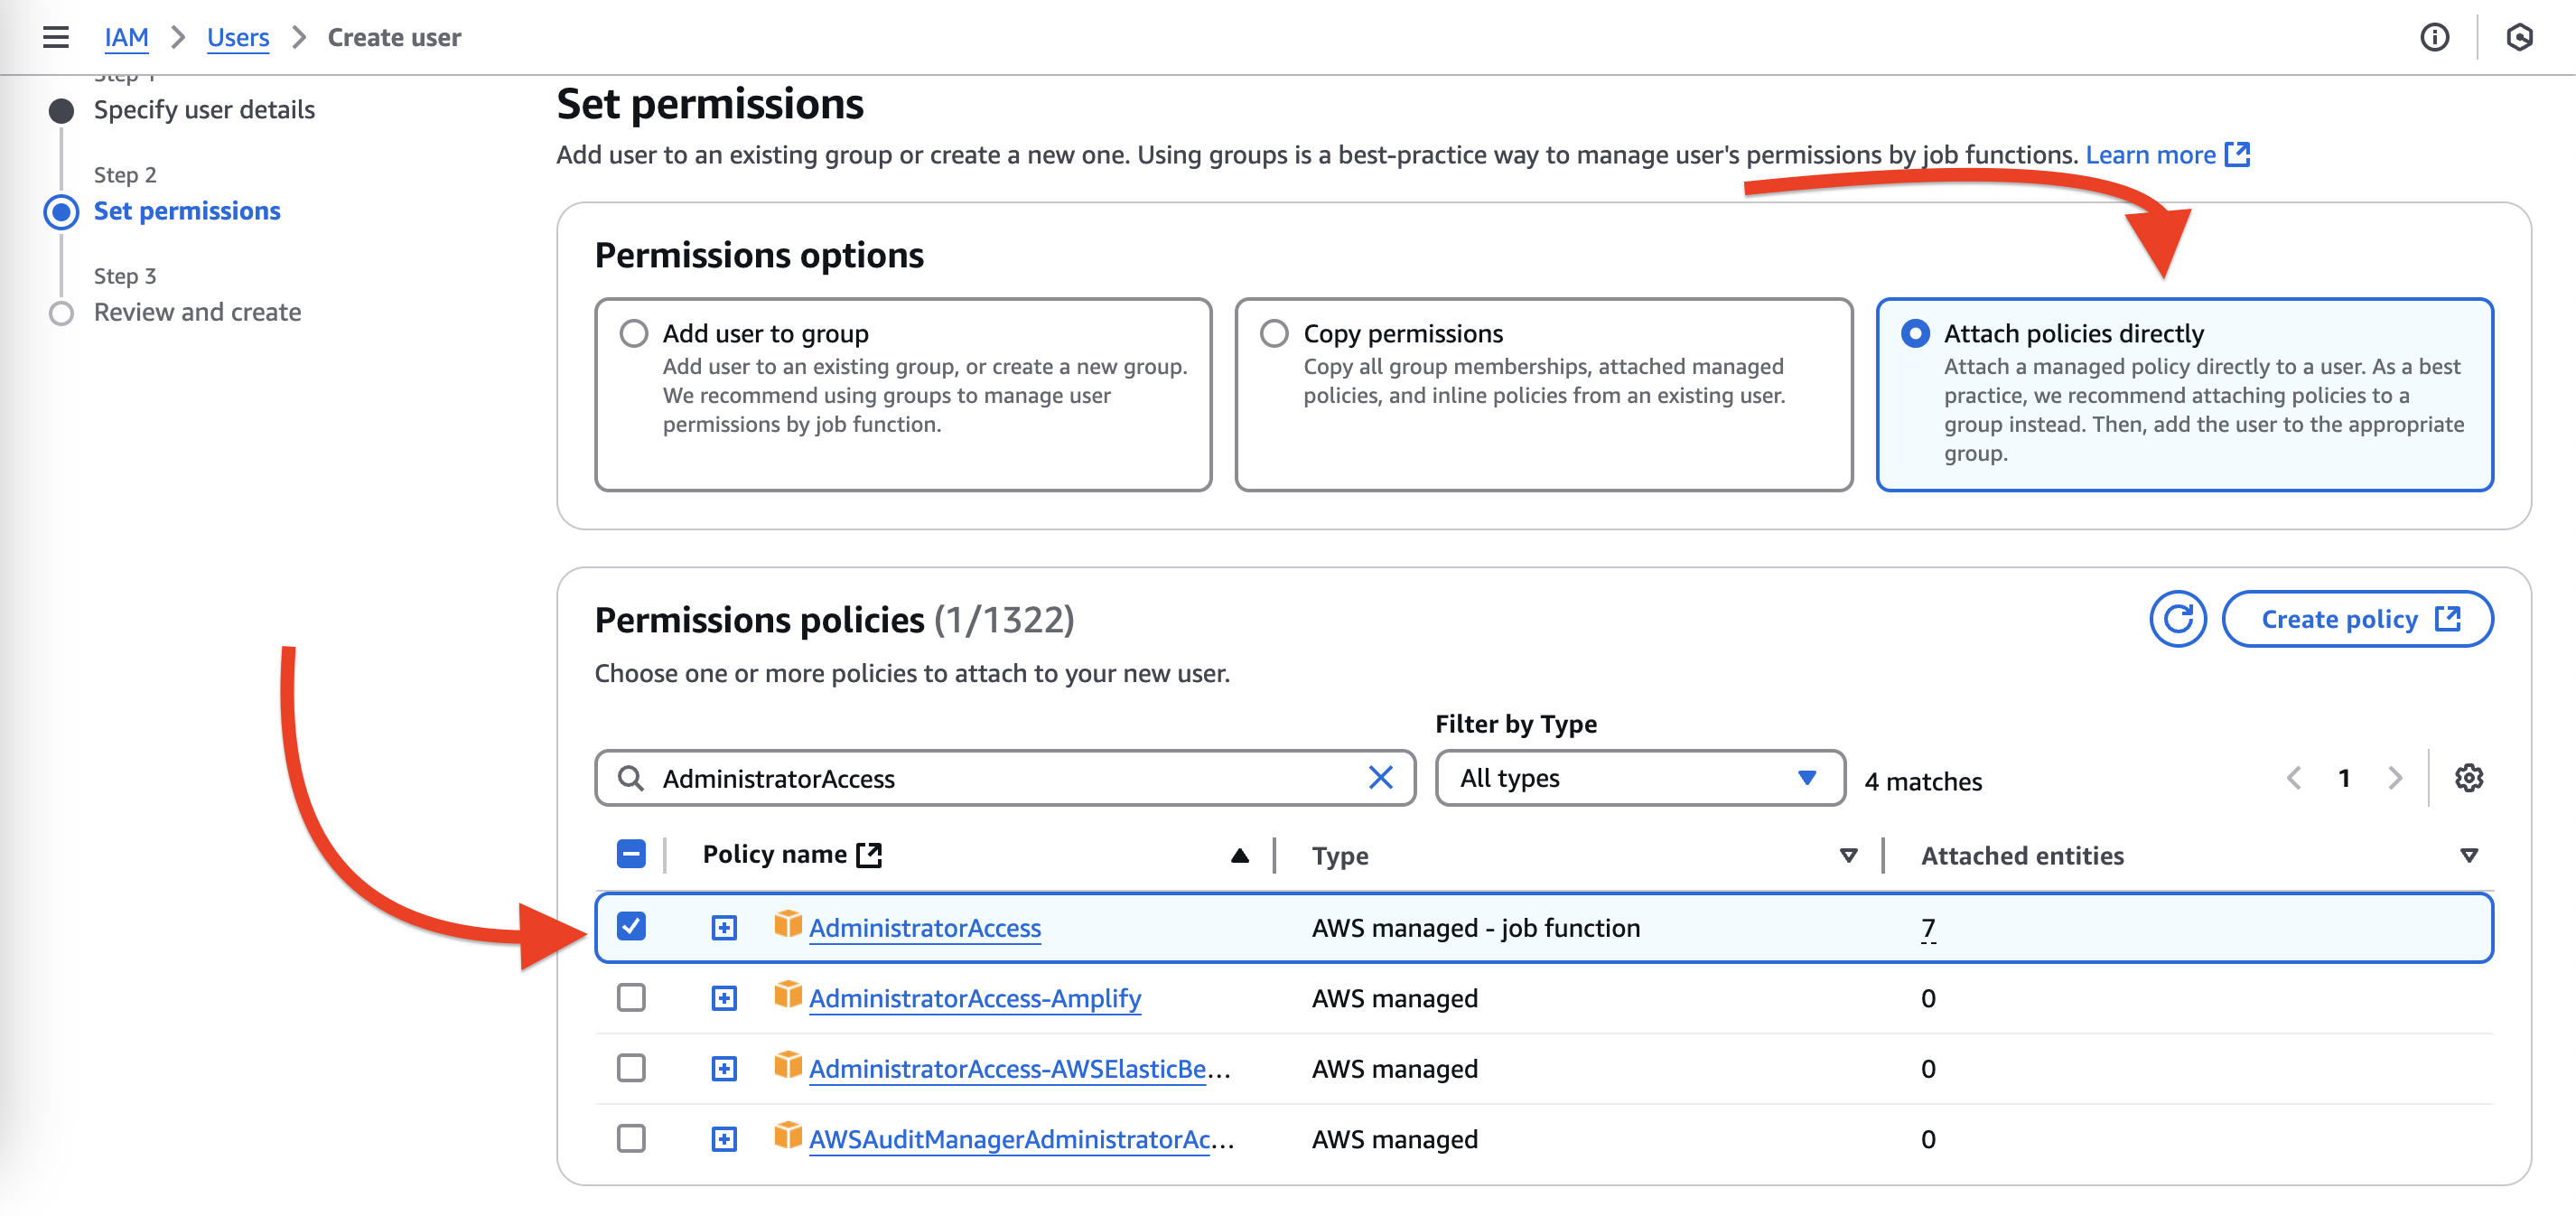
- Click
Create user - Click the user name to choose the user
- Click
Create access key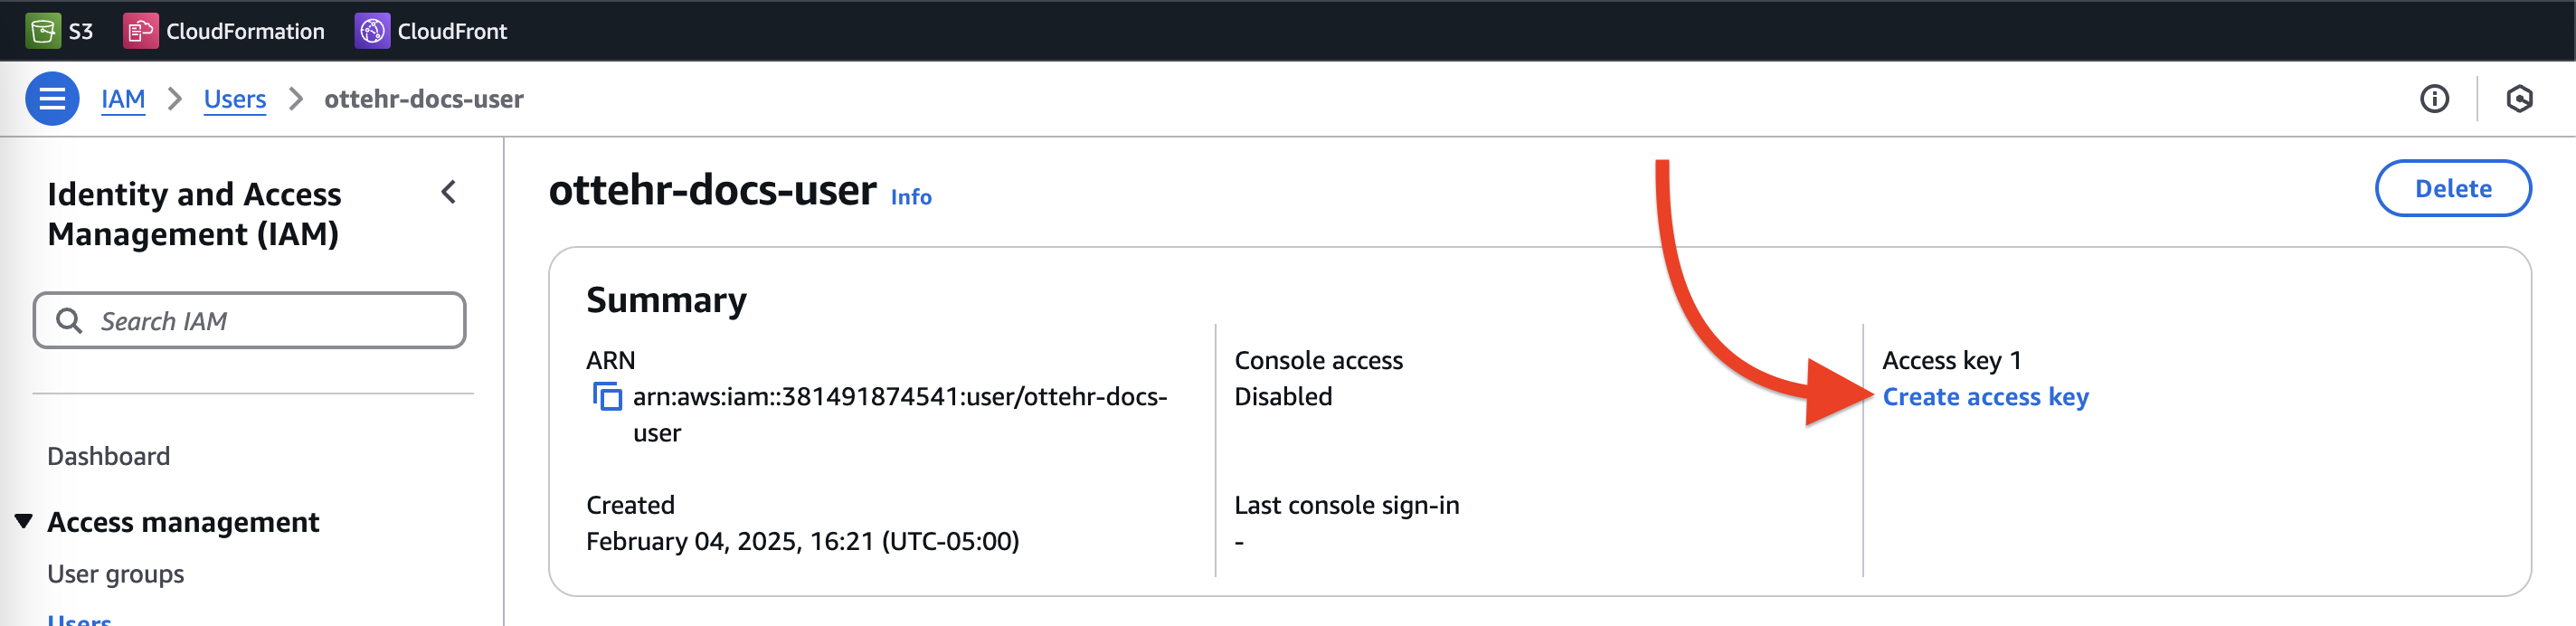
- Click
Command Line Interface (CLI), Check the "I understand" box, clickNext
- Click
Create access key - Save the
Access key IDandSecret access keyin a secure location - Run the following command in your terminal to configure your
ottehrAWS profile:
aws configure --profile ottehrEnter the Access key ID and Secret access key when prompted. For default region name and default output format, press Enter key.
Set up your Oystehr Project
- If you haven't already, follow the steps in the Ottehr repository (opens in a new tab) for creating an Oystehr Account (opens in a new tab) and forking Ottehr (opens in a new tab).
- Create a new project in the Oystehr Developer Console (opens in a new tab). We recommend you name this project after the environment you are deploying to (e.g.
development,testing,production) - In your local Ottehr code, navigate to the
scripts/deploy-testdirectory, and create a file calleddeploy-config.json. - Paste the following JSON into
deploy-config.json:{ "project_id": "your_project_id", "access_token": "your_access_token", "provider_email": "your_provider_email", "environment": "your_environment_name" } - Fill out the four values.
project_id- The ID of your Oystehr project, found in the Oystehr Developer Consoleaccess_token- The access token for your Oystehr project, found in the Oystehr Developer Consoleprovider_email- The email address of a provider you want to use for the project. You will need access to this emailenvironment- The name of the environment you are deploying to (e.g.development,testing,production)
- Save the file
Run the deploy.sh script
Run the following command in your terminal:
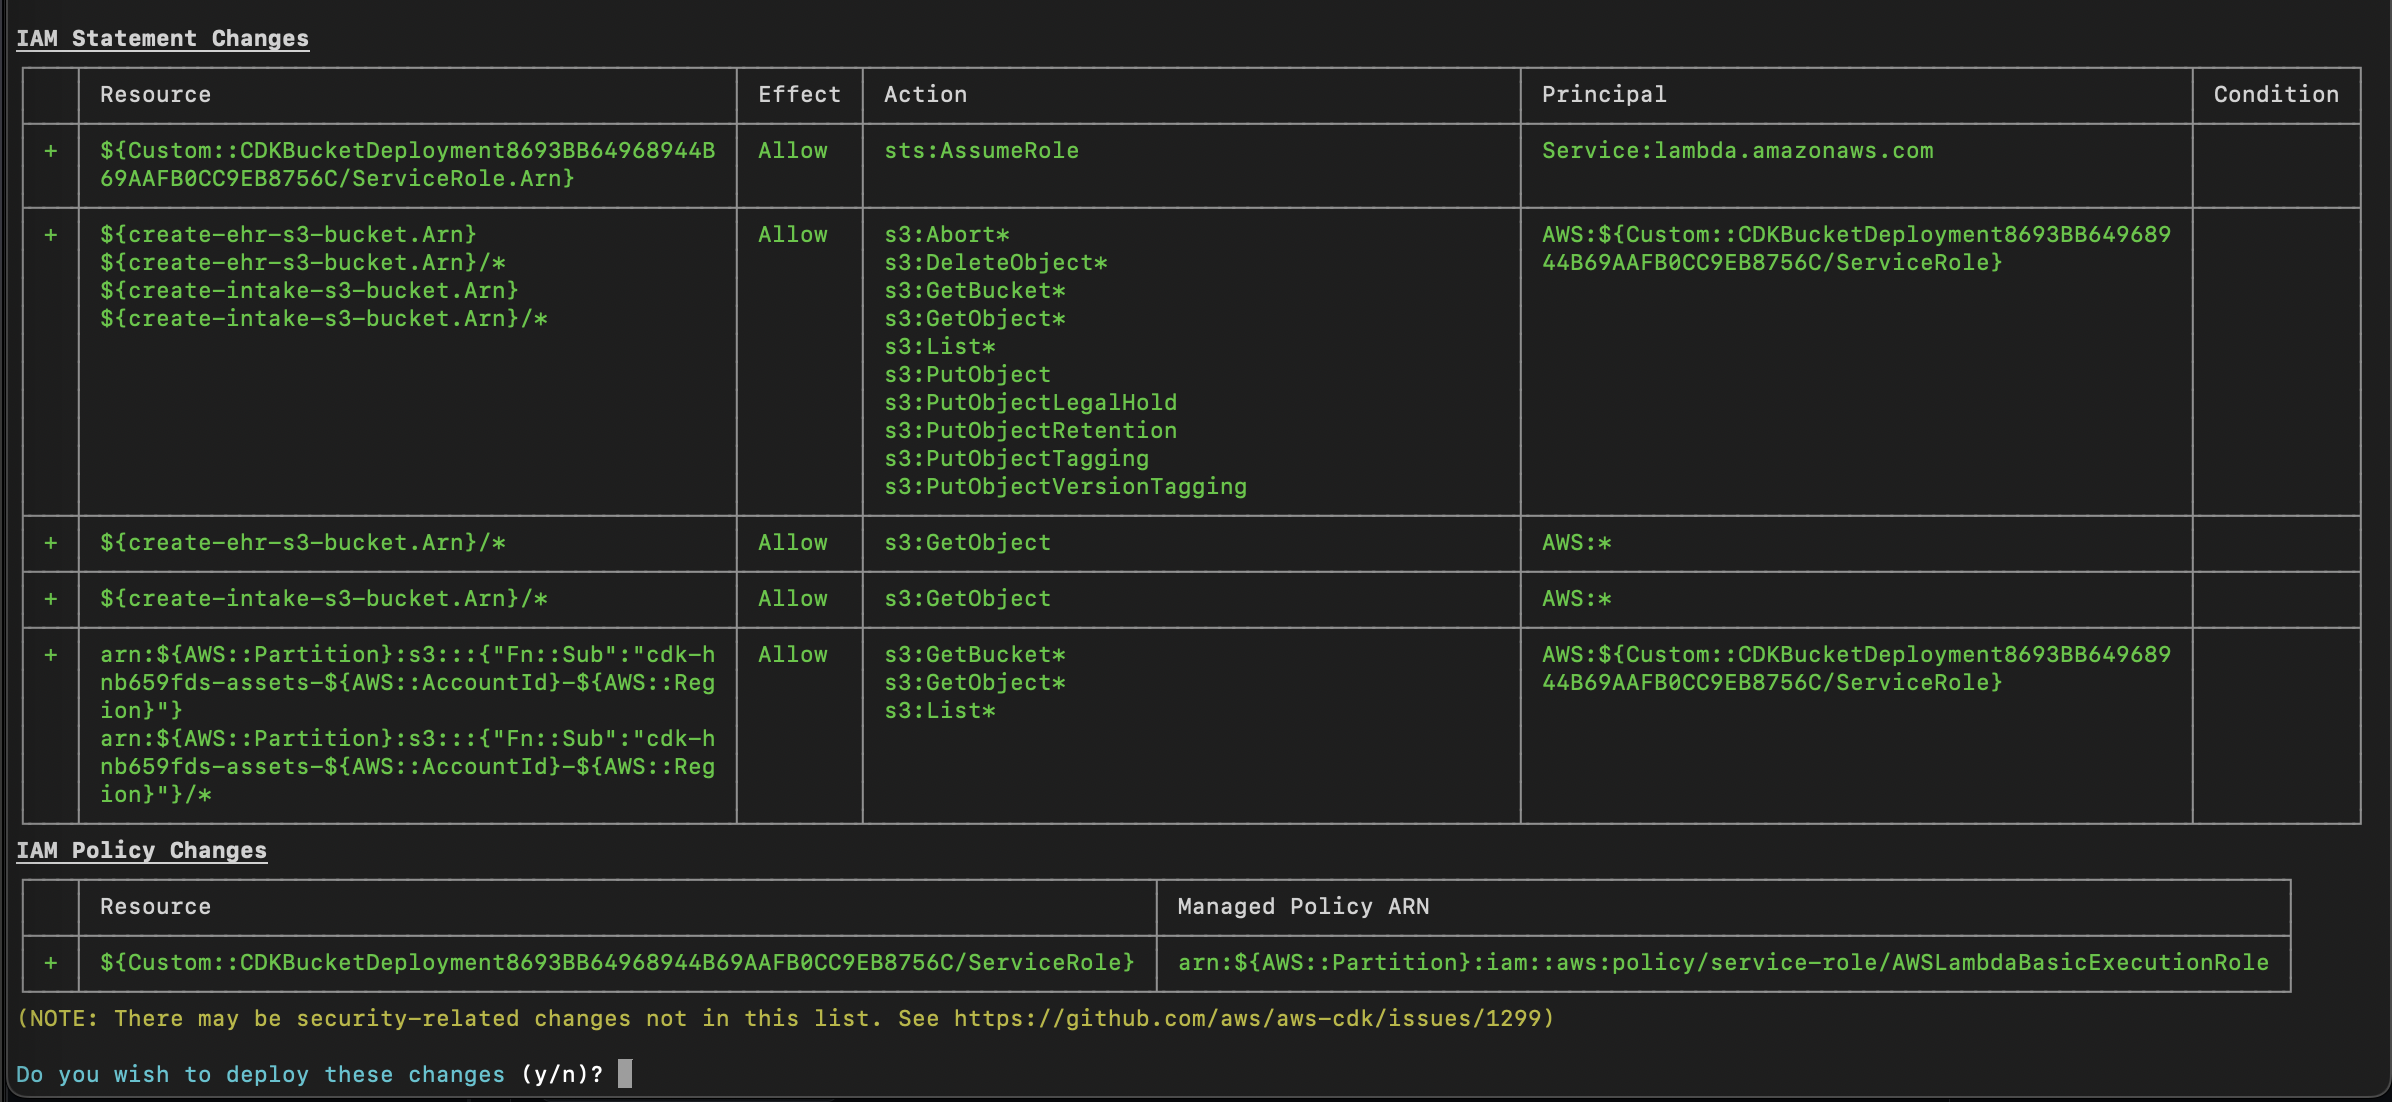
sh scripts/deploy-test/deploy.shThe script will take about 15 minutes to run and will deploy Ottehr to your AWS account.
You may get a message: Do you wish to deploy these changes (y/n)? Type y and hit Enter.
Example output
You can find the URLs for your deployment in the output of the deploy.sh script, for example:
{
  id: 'fbcb635f-1bf1-4795-ad92-074cdb041c29',
  clientId: 'KTOhfebxdG9ro5Gjjiw1IHOgd0RnO4r4',
  name: 'Ottehr Intake',
  description: 'Intake application with sms authentication',
  loginRedirectUri: 'https://d3oj41081wj6zr.cloudfront.net',
  allowedCallbackUrls: [
    'https://d3oj41081wj6zr.cloudfront.net',
    'https://d3oj41081wj6zr.cloudfront.net/redirect'
  ],
  allowedLogoutUrls: [ 'https://d3oj41081wj6zr.cloudfront.net' ],
  allowedWebOriginsUrls: [ 'https://d3oj41081wj6zr.cloudfront.net' ],
  allowedCORSOriginsUrls: [ 'https://d3oj41081wj6zr.cloudfront.net' ],
  mfaEnabled: false,
  passwordlessSMS: true,
  logoUri: 'https://assets-global.website-files.com/653fce065d76f84cf31488ae/65438838a5f9308ca9498887_otter%20logo%20dark.svg',
  shouldSendInviteEmail: false,
  loginWithEmailEnabled: true,
  refreshTokenEnabled: false
}
{
  id: 'c080c104-1777-4968-8015-bfe54ea7b2fd',
  clientId: 'Yph0ptGrXI1ImLnmuBl6r2qhYUC9z8JA',
  name: 'Starter EHR Application',
  description: 'Example',
  loginRedirectUri: 'https://d49bon68zzhww.cloudfront.net',
  allowedCallbackUrls: [ 'https://d49bon68zzhww.cloudfront.net' ],
  allowedLogoutUrls: [ 'https://d49bon68zzhww.cloudfront.net' ],
  allowedWebOriginsUrls: [ 'https://d49bon68zzhww.cloudfront.net' ],
  allowedCORSOriginsUrls: [ 'https://d49bon68zzhww.cloudfront.net' ],
  mfaEnabled: false,
  passwordlessSMS: false,
  shouldSendInviteEmail: false,
  loginWithEmailEnabled: true,
  refreshTokenEnabled: false
}
You can use the loginRedirectUri for each application to access the application you have deployed.
Environments
We recommend having a separate Oystehr Project for each of your environments.
For example, you may want to have different intake websites on development.ottehr-intake.example.com and testing.ottehr-intake.example.com and each will have its own Oystehr Project so the resources from one project are not connected to another.