Development
Ottehr can be run in three ways: locally in development mode, on a remote server in development mode, and deployed to a cloud environment. This page reviews the tooling available in development mode and the system requirements to run Ottehr. These recommendations are not relevant to production deployments, since those use cloud-native resources instead of individual compute resources.
Supported Operating Systems
Ottehr supports macOS, Debian- and RHEL-based Linux, and Linux running on the Windows Subsystem for Linux. Other Windows shell environments, such as cmd or PowerShell, are not supported.
Running Ottehr Locally in Development Mode
To run locally or on a remote server, Ottehr uses Vite to host the Patient Portal and EHR applications, and a local Express service to run Zambda functions. Vite supports hot-reloading and the Express server is run using nodemon to enable hot-reloading of Zambda functions as well.
We recommend a system with at least 4 CPU cores and 16 GB of RAM for working on Ottehr.
To run Ottehr in development mode, after installing dependencies (npm ci) and running the setup script (opens in a new tab), simply run the apps:start script from the project root:
npm run apps:startThis will start the Patient Portal application on ports 3000-3002 and the EHR application on ports 4000-4002. By default, Ottehr binds to 0.0.0.0, so it is accessible on any local network interface.
Running Ottehr on a Remote Server in Development Mode
Do not run Ottehr in development mode for you production service! Instead, follow the AWS deployment guide or GCP deployment guide to safely and cost-effectively host your production environment.
There are three main differences to keep in mind when choosing to run Ottehr on cloud compute.
TLS and HTTPS
Oystehr's authentication system requires the Patient Portal and EHR applications to be served over HTTPS when they are not accessed via http://localhost or http://127.0.0.1. If the applications are accessed unencrypted over HTTP, the entire page will be blank and an error will be shown in the web browser developer console. This is true even when accessing the website by IP address.
There are multiple approaches to addressing this, but which one is right for you will depend on your familiarity with TLS encryption and your existing infrastructure.
Front Your Service with a TLS Provider
Many cloud providers offer TLS "wrapping" for services hosted on their cloud or others. CloudFlare offers TLS termination through their DNS Proxy service (opens in a new tab). CloudFront (opens in a new tab) can be used for TLS termination on AWS.
The behaviors, benefits, and drawbacks of these systems vary, and your choice will likely be based on your existing infrastructure. We recommend CloudFlare if your team is starting from scratch.
Use Let's Encrypt or Another TLS Certificate Provider
Let's Encrypt (opens in a new tab) provides a system for securing auto-renewing certificates trusted by all browsers. For more information on how Let's Encrypt works, and the tooling you will need to install to support this approach, please see their documentation (opens in a new tab).
You can also acquire a TLS certificate from another provider, such as your Domain Name Registrar, and use it with Ottehr.
Once you have your certificate and private key in hand, follow the directions below to set up Ottehr to use TLS.
Generate a Self-Signed Certificate
Creating a self-signed certificate generates a new TLS certificate and private key that can be used to serve encrypted HTTPS traffic. However, the certificate is not trusted by web browsers because it was not created by a certificate authority. Creating your own self-signed certificate is a good option if you only need to temporarily run Ottehr in developer mode, or if you don't need the Patient Portal or EHR applications to be trusted by browsers.
To generate a self-signed certificate for Ottehr, run the following commands. You will need to answer the prompts to create the certificate.
openssl req -x509 -newkey rsa:2048 -keyout keytmp.pem -out cert.pem -days 365
openssl rsa -in keytmp.pem -out key.pem
rm keytmp.pem
Once you've run those commands, proceed to the next section to configure Ottehr to use the certificate and private key to serve traffic over HTTPS.
Using a TLS Certificate with Ottehr
Ottehr will automatically detect the presence of a TLS certificate and private key in the env directory of each project. The certificate and key should be named as shown below:
cert.pem
key.pem
Add your certificate and key to each of these directories:
apps/ehr/env/
apps/intake/env/
packages/zambdas/.env/
Run Ottehr using npm run apps:start from the project root directory and verify you can access all services over HTTPS.
Networking and Security
Setting up and restricting access to remote servers is a key part of cloud computing. Different clouds have different network architectures, and different tools for securing access. We recommend denying access generally and whitelisting only your IP and the IPs of your teammates who need to view the instance of Ottehr running on the remote server. You can see examples of configuring a secure remote server on AWS below.
Additionally, your Ottehr project and installation will need to be configured to reference the public IP or public DNS entry for your remote server. This is used for authentication and when running Zambdas or linking between applications.
Configuration using IaC
If you are using Infrastructure as Code (IaC) to configure Ottehr (the default behavior), you will need to add a domain for your EHR and Patient Portal applications in the IaC configuration. You should add the public IP address and/or public domain name of your remote server, or custom domain name if you have one. For example, on AWS EC2, every Instance has a public IPv4 address and public IPv4 DNS; you should add both of these if you are going to use them.
You will need to update two configuration files in your IaC setup:
# deploy/{env}.tfvars
ehr_domain = "ec2-255-255-255-255.compute-1.amazonaws.com:4002"
patient_portal_domain = "ec2-255-255-255-255.compute-1.amazonaws.com:3002"

# packages/zambdas/.env/{env}.json
"WEBSITE_URL": "https://ec2-255-255-255-255.compute-1.amazonaws.com:3002"
"PATIENT_LOGIN_REDIRECT_URL": "https://ec2-255-255-255-255.compute-1.amazonaws.com:3002"
"PATIENT_ALLOWED_URL_1": "http://ec2-255-255-255-255.compute-1.amazonaws.com:3002",
"PATIENT_ALLOWED_URL_2": "http://ec2-255-255-255-255.compute-1.amazonaws.com:3002/patients",
"PATIENT_ALLOWED_URL_3": "http://ec2-255-255-255-255.compute-1.amazonaws.com:3002/redirect",
"PATIENT_ALLOWED_URL_4": "https://ec2-255-255-255-255.compute-1.amazonaws.com:3002",
"PATIENT_ALLOWED_URL_5": "https://ec2-255-255-255-255.compute-1.amazonaws.com:3002/patients",
"PATIENT_ALLOWED_URL_6": "https://ec2-255-255-255-255.compute-1.amazonaws.com:3002/redirect",
"PROVIDER_LOGIN_REDIRECT_URL": "https://ec2-255-255-255-255.compute-1.amazonaws.com:4002/dashboard",
"PROVIDER_ALLOWED_URL_1": "http://ec2-255-255-255-255.compute-1.amazonaws.com:4002",
"PROVIDER_ALLOWED_URL_2": "http://ec2-255-255-255-255.compute-1.amazonaws.com:4002/dashboard",
Some cloud providers, such as AWS EC2, do not provide a static, persistent public IP address by default. Instead, you'll receive a new IP address every time you stop and start the remote server. Allocate a static public IP address to avoid frequently reconfiguring Oystehr and Ottehr.
Configuration for Legacy Deployments
Configuration for Legacy Deployments
If you are not using IaC to configure Ottehr, you will need to update the allowed URLs in the Oystehr developer console and the Ottehr environment files directly on the remote server. See the sections below for more information.
Configure Oystehr Application URLs
In order to enable authentication on your remote server, you will need to update the allowed URLs for both the Ottehr Patient Portal and Ottehr EHR applications in the Oystehr developer console (opens in a new tab). By default, these applications allow authentication for http://localhost and https://localhost. You should add the public IP address and/or public domain name of your remote server, or custom domain name if you have one. For example, on AWS EC2, every Instance has a public IPv4 address and public IPv4 DNS; you should add both of these if you are going to use them.
Some cloud providers, such as AWS EC2, do not provide a static, persistent public IP address by default. Instead, you'll receive a new IP address every time you stop and start the remote server. Allocate a static public IP address to avoid frequently reconfiguring Oystehr and Ottehr.
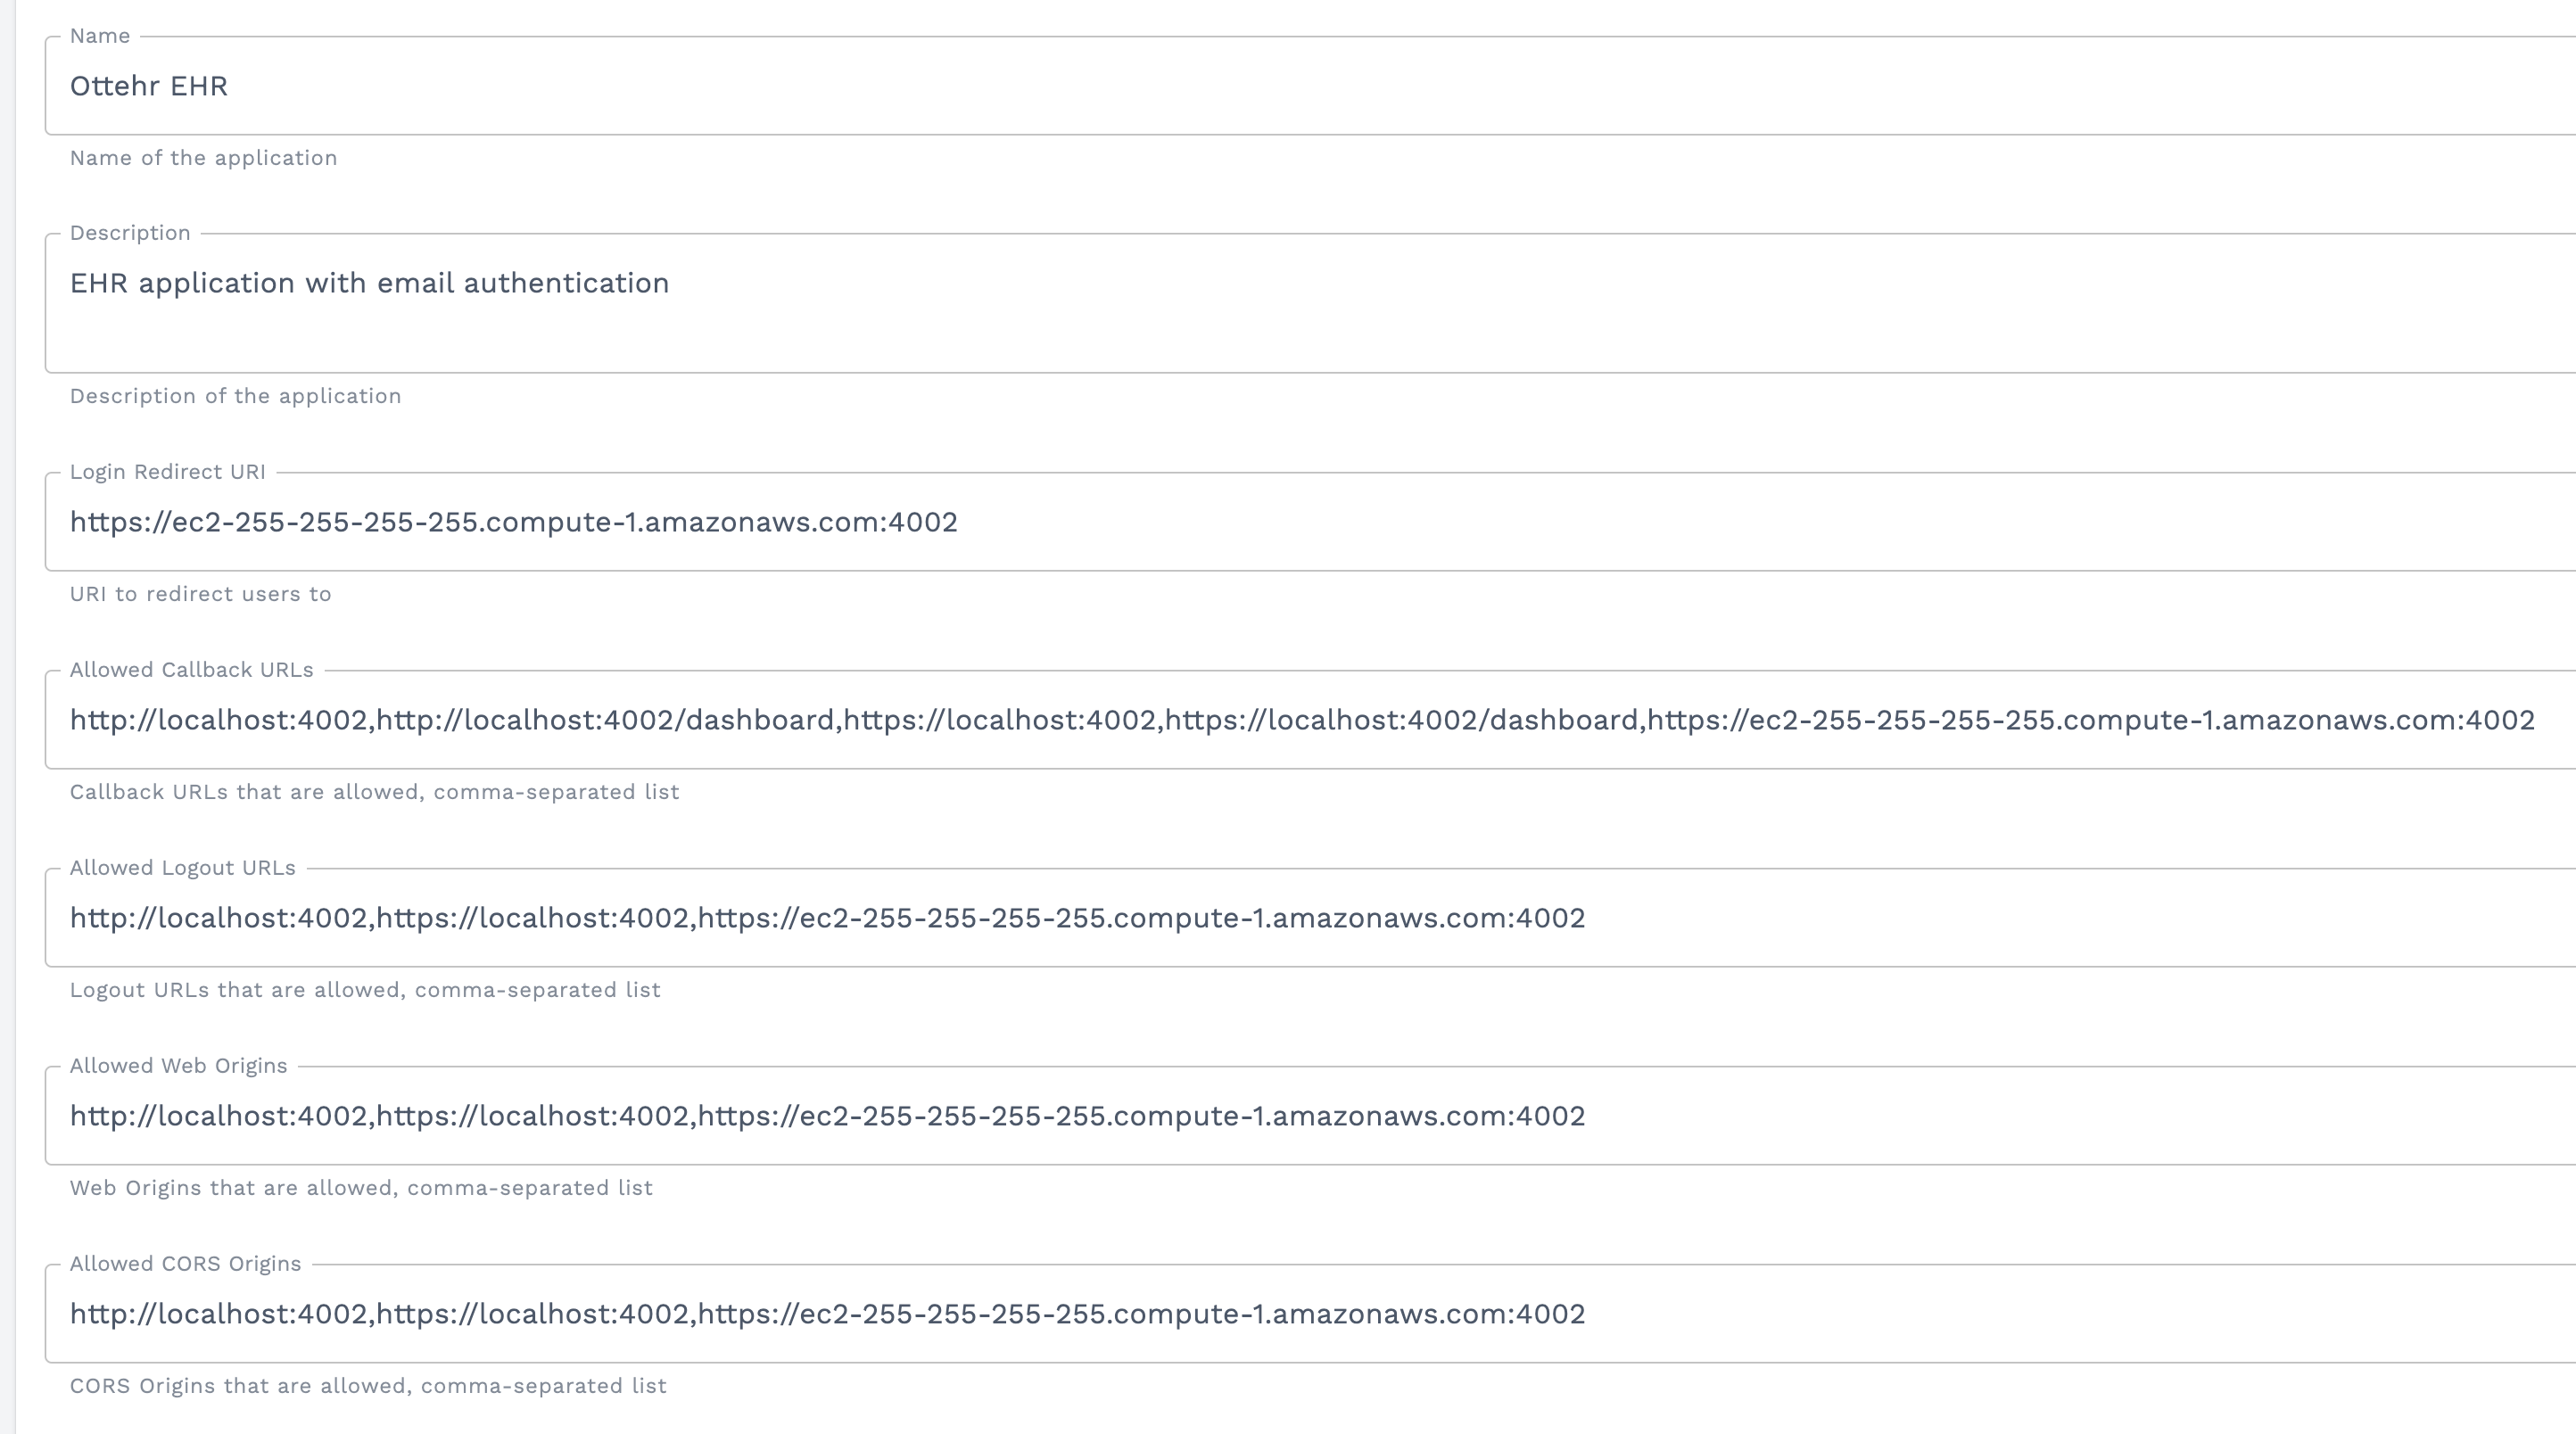
Update the "Login Redirect URI", "Allowed Callback URLs", "Allowed Logout URLs", "Allowed Web Origins", and "Allowed CORS Origins" to include your remote server's public IP address or domain name. These values are comma-separated lists. Here is what the EHR application would look like for an EC2 remote server with a public DNS name of ec2-255-255-255-255.compute-1.amazonaws.com:
Configure Ottehr Environment Files
Next, update the Ottehr installation on your remote server to use your public IP or domain name to talk to its backend. By default all communication is done using http://localhost. Since the Ottehr backend will be on the remote server, your local web browser will not be able to access it without knowing its location. Using the same public DNS name from the example in the previous step, you would update the Ottehr config files like this:
# apps/ehr/env/.env/local
VITE_APP_OYSTEHR_APPLICATION_REDIRECT_URL=https://ec2-255-255-255-255.compute-1.amazonaws.com:4002
VITE_APP_INTAKE_URL=https://ec2-255-255-255-255.compute-1.amazonaws.com:3002
VITE_APP_PROJECT_API_ZAMBDA_URL=https://ec2-255-255-255-255.compute-1.amazonaws.com:4000/local
VITE_APP_INTAKE_ZAMBDAS_URL=https://ec2-255-255-255-255.compute-1.amazonaws.com:3000/local
VITE_APP_QRS_URL=https://ec2-255-255-255-255.compute-1.amazonaws.com:3002

# apps/intake/env/.env/local
VITE_APP_PROJECT_API_URL=https://ec2-255-255-255-255.compute-1.amazonaws.com:3000/local

# packages/zambdas/.env/local.json
"WEBSITE_URL": "https://ec2-255-255-255-255.compute-1.amazonaws.com:3002"

# packages/zambdas/.env/local.json
"WEBSITE_URL": "https://ec2-255-255-255-255.compute-1.amazonaws.com:3002"
Example: Running Ottehr on an EC2 Instance
Running Ottehr on an EC2 instance requires the ability to launch new instances and configure security groups.
To get started, Launch an Instance in the EC2 dashboard:
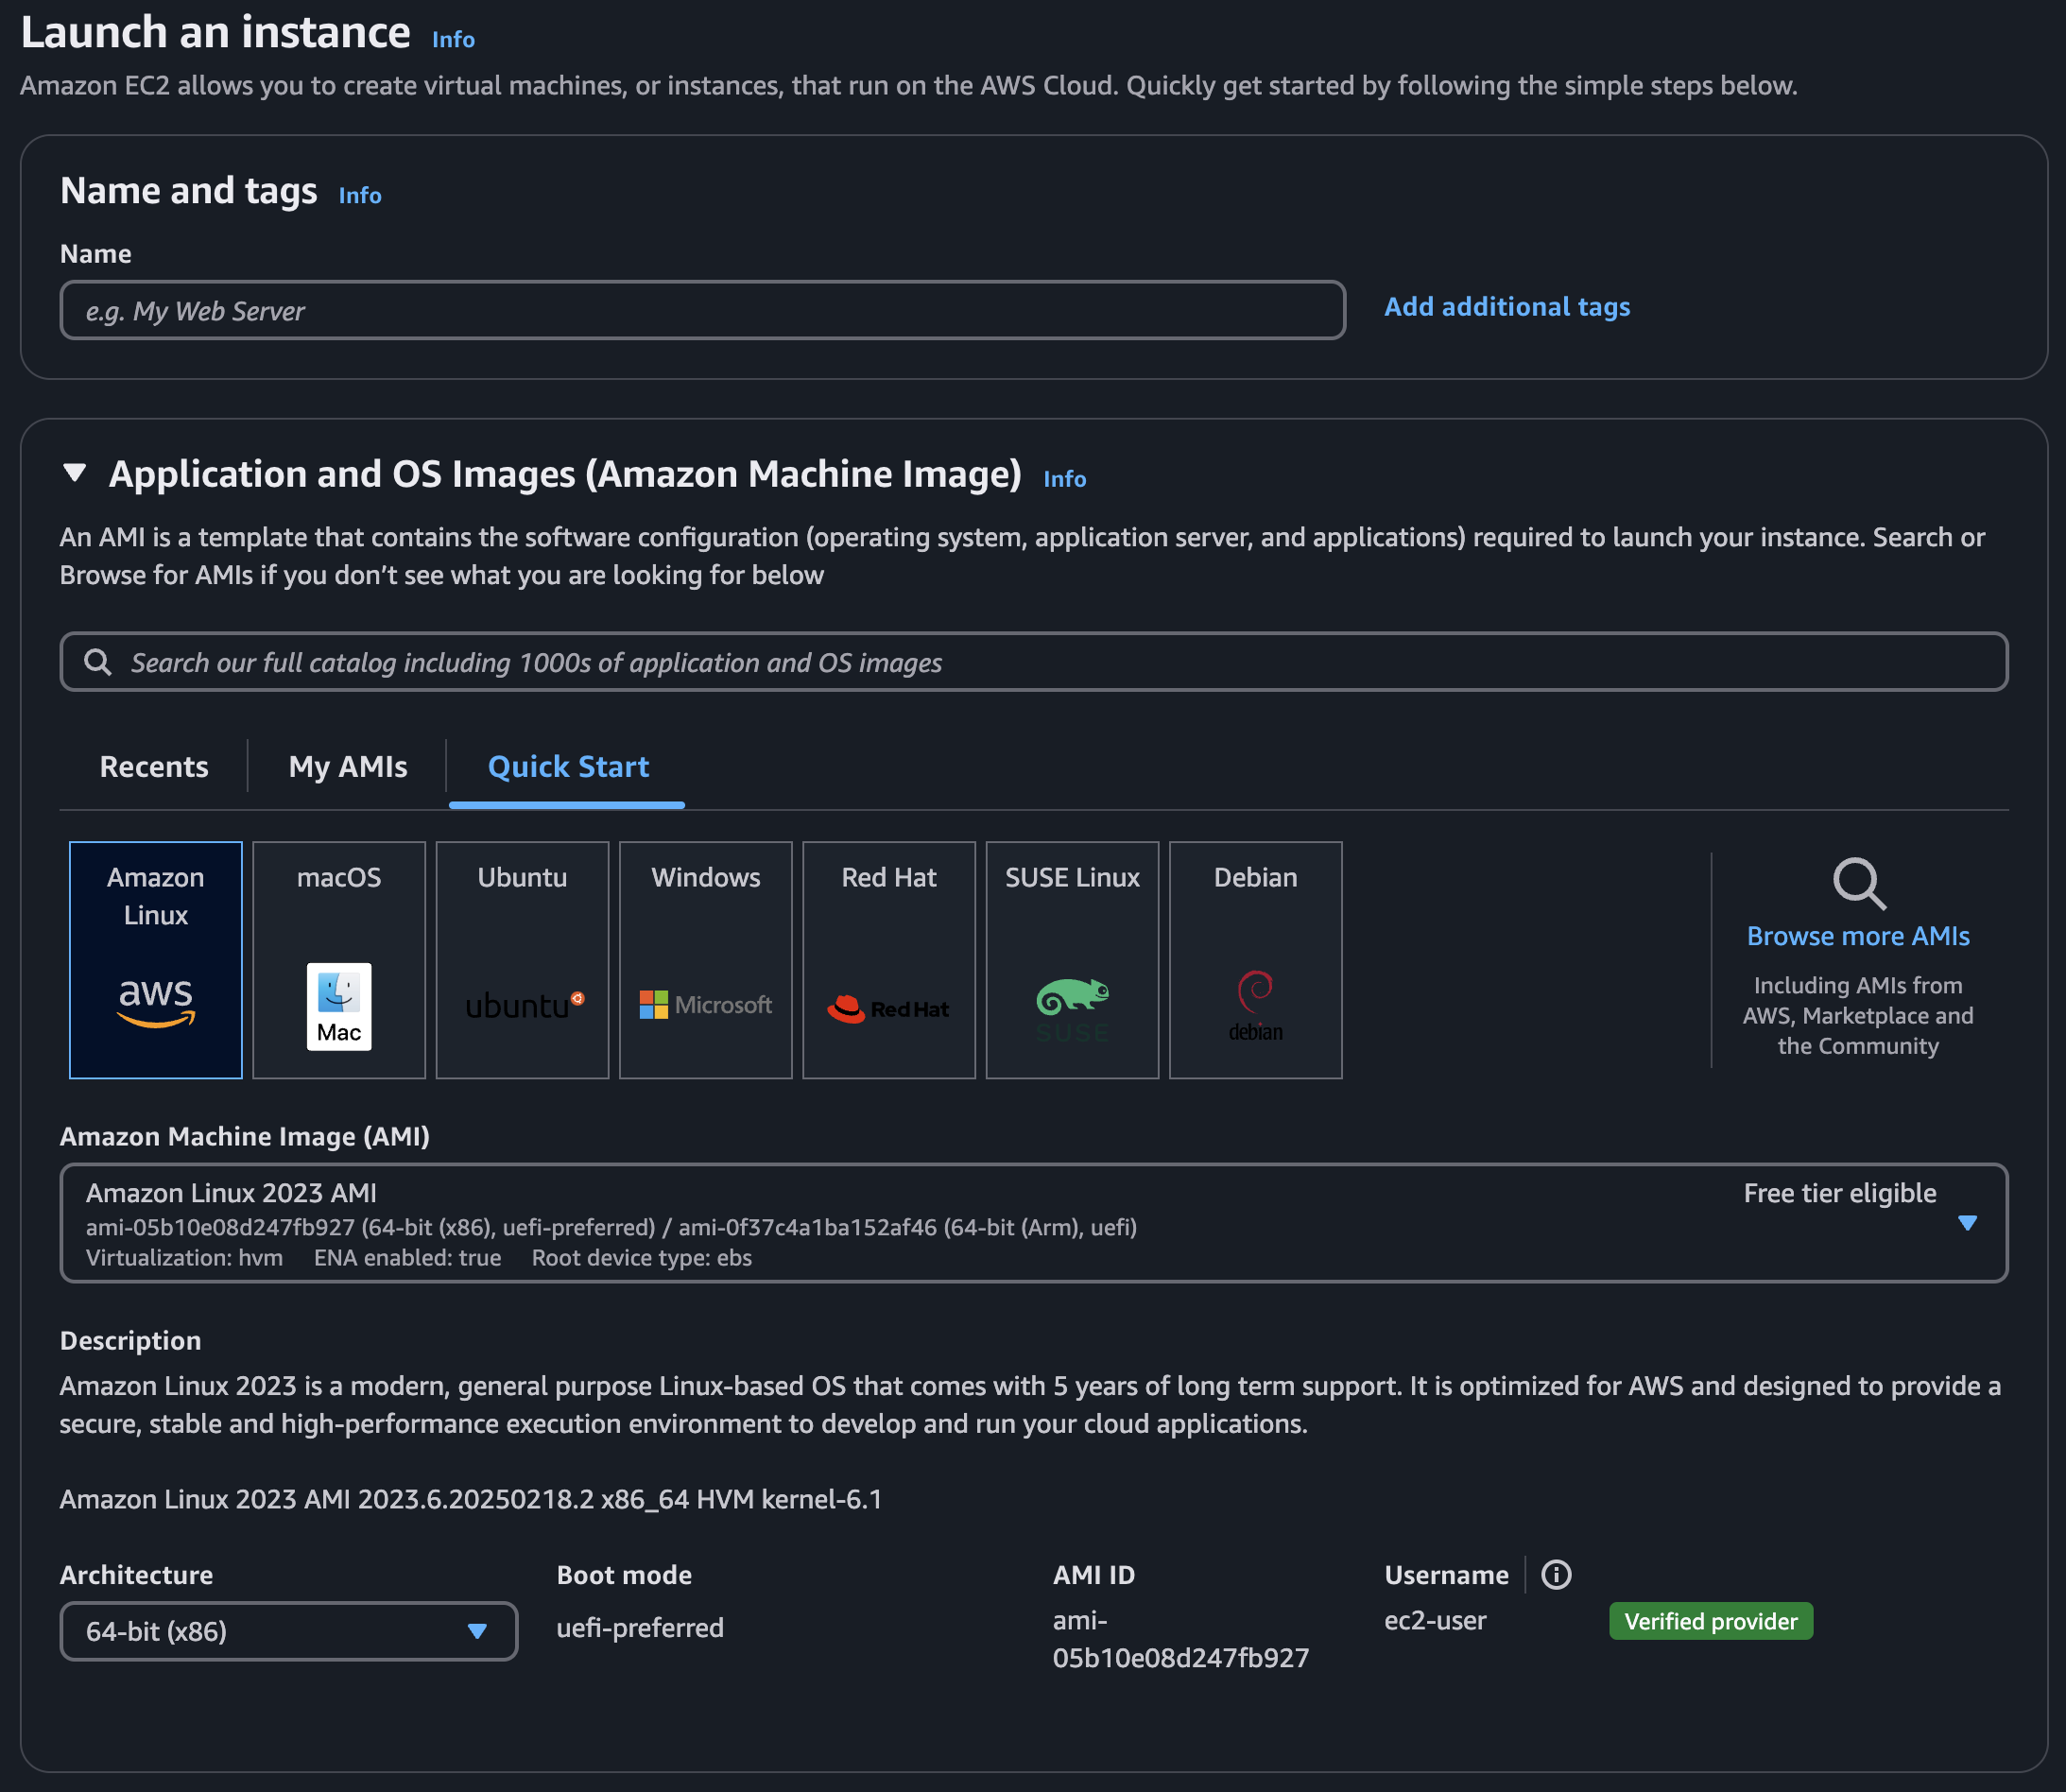
Ottehr supports both Debian- and RHEL-based Linux distributions. We recommend Ubuntu or Amazon Linux 2023.
Next select an instance type. Your instance type should have at least 32 GB of RAM, but otherwise a general purpose instance type is sufficient:

Make sure to select or create a keypair to enable SSH access:

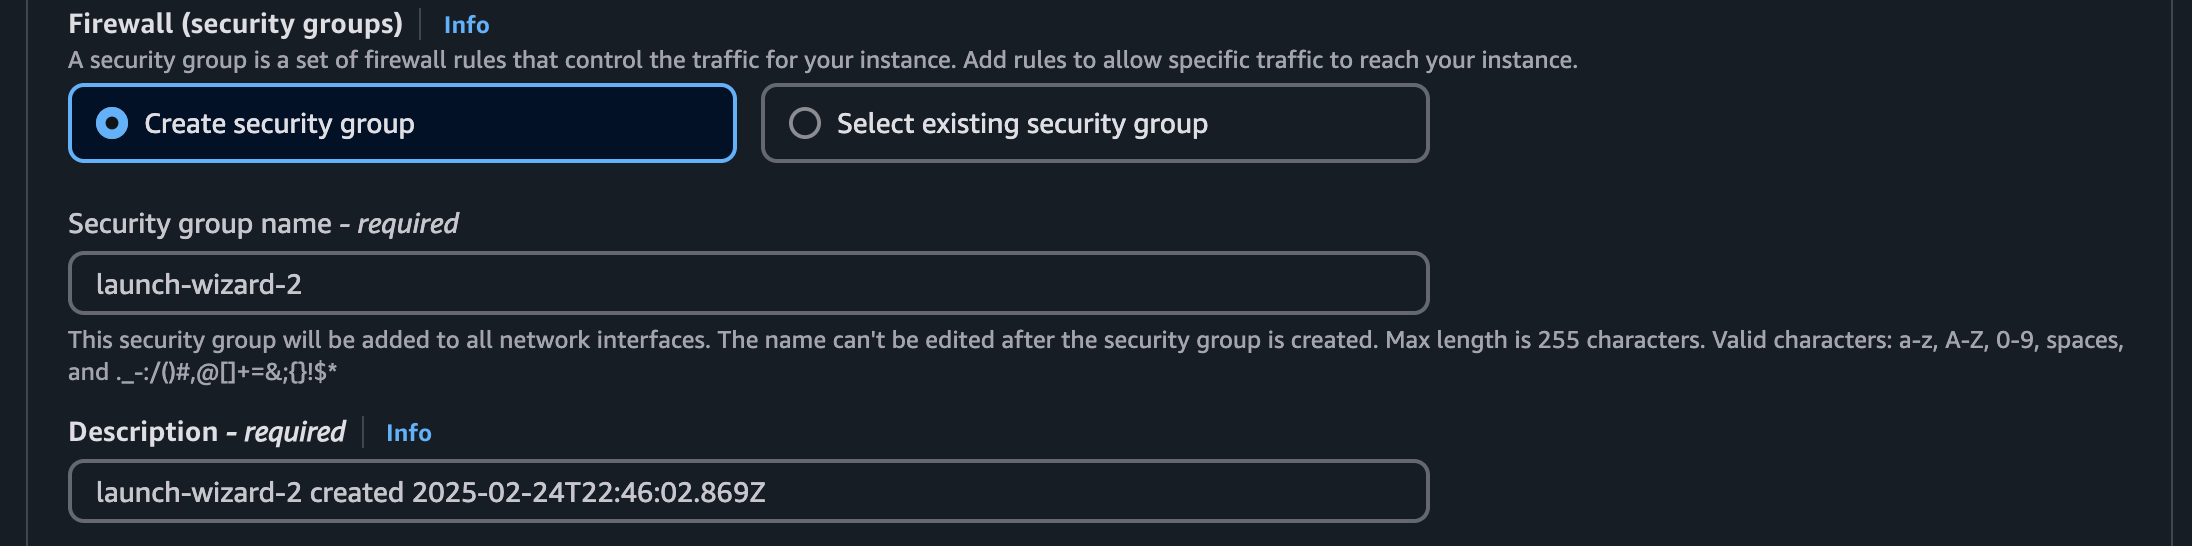
The last step in the AWS Console is to configure your networking rules. Click the "Edit" button in the Network Settings section to enable advanced options. Then select the "Create security group" radio button and name your security group:
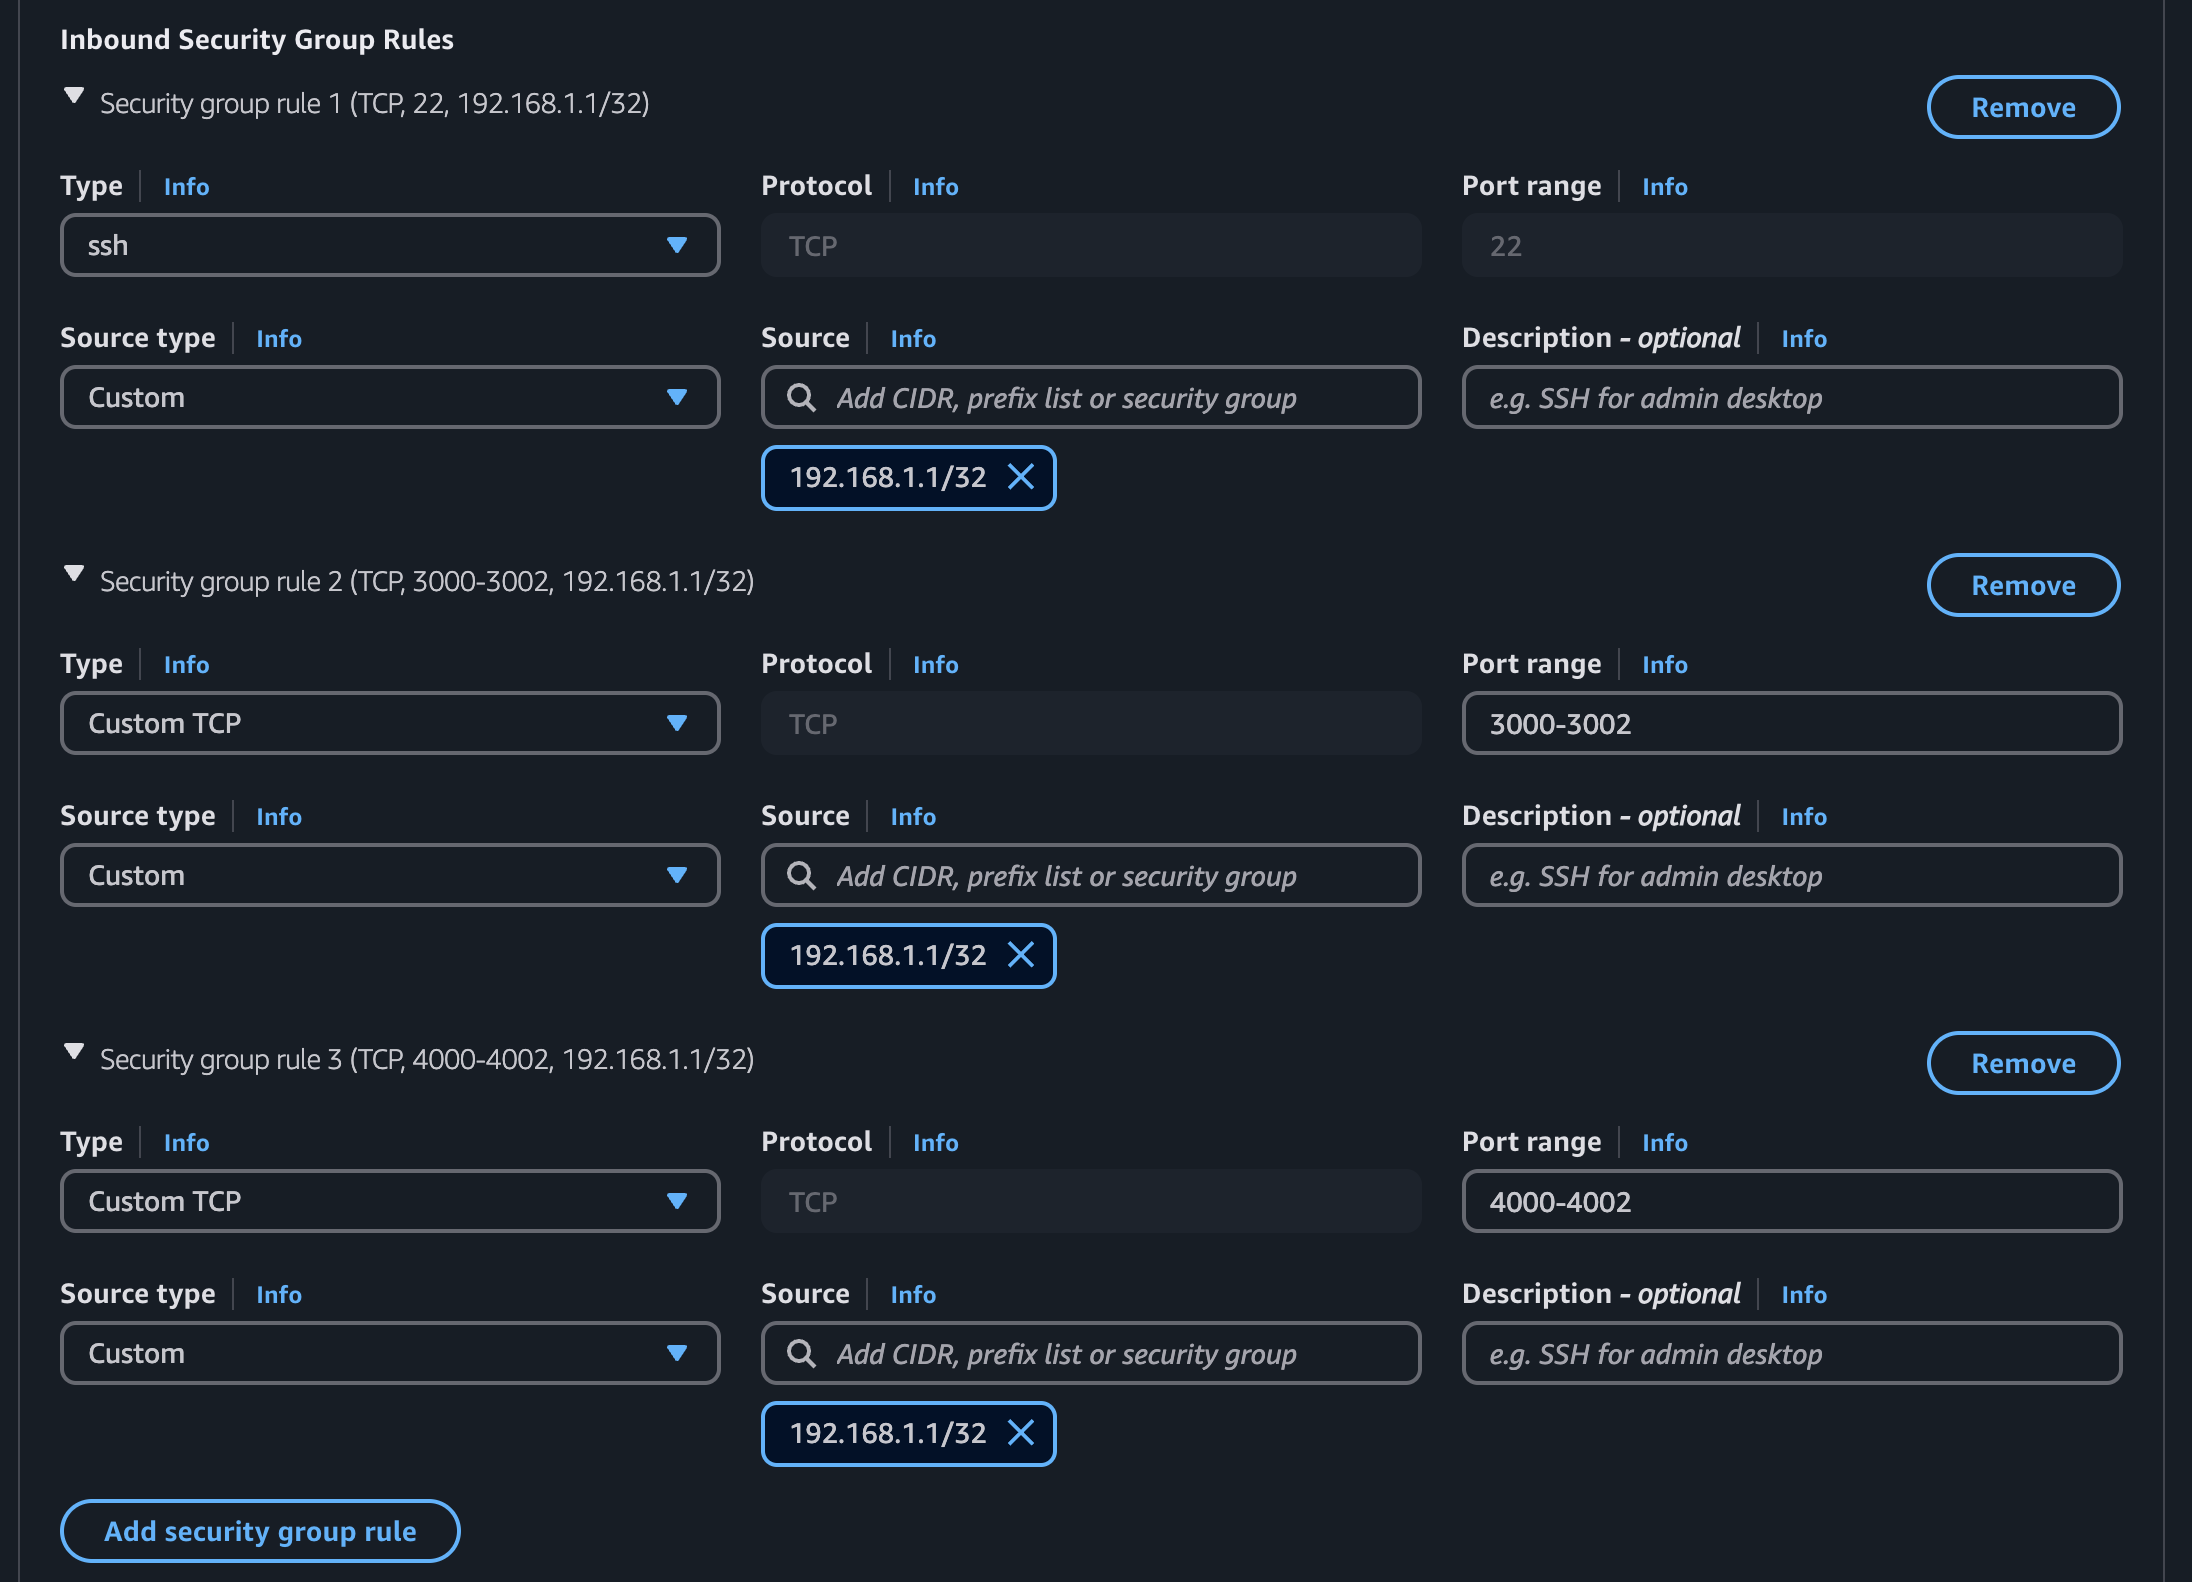
Add rules exposing both SSH and the required ports for Ottehr (substitute your own IP address into the "Source" field):
Remaining steps are completed on the remote server:
- Set up the local environment for IaC (opens in a new tab)
- Run the setup script (opens in a new tab)
- Change networking configuration to match your public IP address or domain name, as discussed in Networking and Security
- Enable HTTPS support by either adding a certificate and private key as shown above or fronting it with a TLS provider
- Start Ottehr with
npm run apps:start
Remote servers should not be used for your production environment. Use the deployment guide to provision your production environment using cloud-native resources that bill by usage.