Customizing paperwork
Ottehr allows patients to book appointments and complete any necessary paperwork for those appointments. Without having to touch the code, Ottehr allows you to customize what questions you ask patients, and on which pages you ask those questions.
How it works
Ottehr uses a FHIR Questionnaire Resource (opens in a new tab) to store information about paperwork questions and how they should appear to patients. Then, Ottehr Intake uses that Questionnaire to generate frontend pages for patients to fill out. The result is a patient intake process that is completely customizable without having to write any additional code.
Question examples
{
  "linkId": "patient-street-address",
  "text": "Street address",
  "type": "string",
  "required": true
}
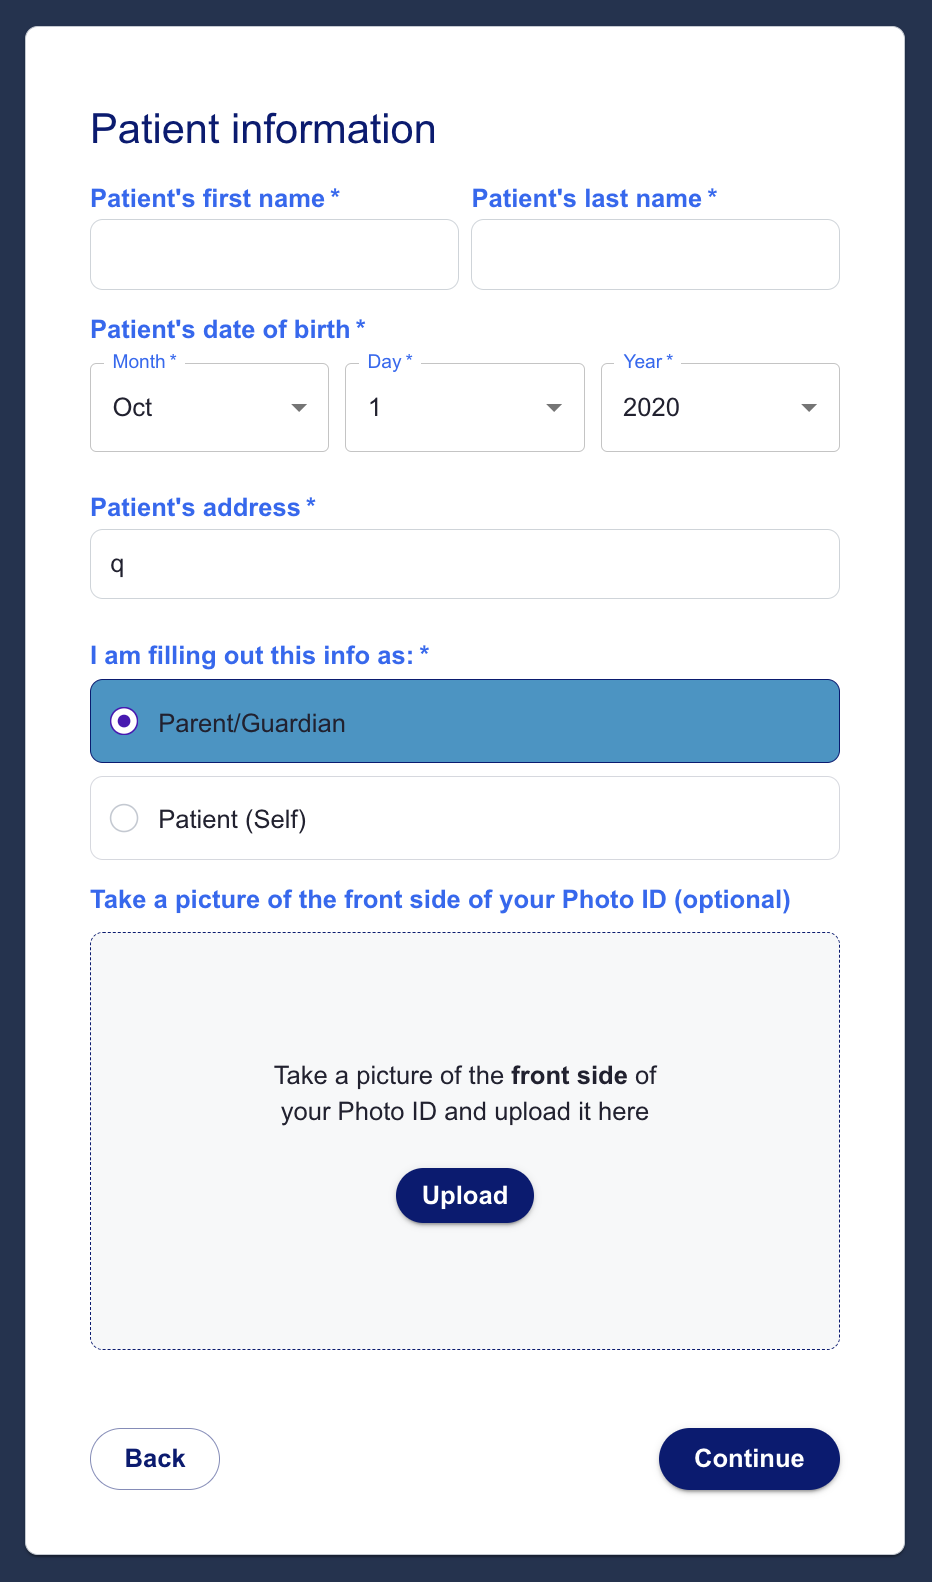
Interactive demo
The following demonstration allows you to comprise a basic questionnaire using Text, Date, and Select questions.
Select one of the following examples, or edit the JSON
Questionnaire:
Form:
Finding the correct Questionnaire
You customize the paperwork that patients fill out when they book an appointment by going to the Oystehr Developer Console (opens in a new tab) and searching for "Questionnaire" (opens in a new tab). The Questionnaire for Ottehr Scheduled In-Person Intake (opens in a new tab) has the name "paperwork", while that for Ottehr Unscheduled Telemedicine Intake (opens in a new tab) has the name "telemed". Customization works the same for both of these cases, and for any other Questionnaires you create.
Customizing the Questionnaire
At the most basic level, every page of paperwork is represented by an item on the Questionnaire with type "group". Then, every question on a page of paperwork is represented by an item on the page. Thus, Questionnaire.item (opens in a new tab) represents a page of paperwork, and every Questionnaire.item.item (opens in a new tab) represents a question on that page. Therefore, to add a page to the paperwork, you add an item to the Questionnaire (opens in a new tab), and to add a question to that page, you add an item to its Questionnaire.item (opens in a new tab).
Below is an explanation of how to customize the paperwork:
Page title
Set the page title using Questionnaire.item.text.
Page type
Questionnaire.item.type must be set to "group" for every page in your questionnaire.
Page review text
Review text is the name used for this page at the end of the booking process, when a patient is shown an overview of which paperwork pages they have completed.
To set the review text, create a Questionnaire.item.extension with url "https://fhir.zapehr.com/r4/StructureDefinitions/review-text" and set its valueString to the name of your choice.
"extension": [
  {
    "url": "https://fhir.zapehr.com/r4/StructureDefinitions/review-text",
    "valueString": "your_review_text"
  }
],
Page ID
A unique identifier for the paperwork page.
Set the id of a paperwork page using Questionnaire.item.linkId.
Question ID
A unique identifier for a question of paperwork on a page. This will be used for enableWhen and requireWhen.
Set the id of a question using Questionnaire.item.item.linkId.
Question text
Question text is used to communicate to the user what information they should be giving in a given question. Depending on the question, question text will appear in different places. Some examples: First Name, Address, Do you want to opt in?
Set the text of a question using Questionnaire.item.item.text.
Question type
Otter supports multiple types of page question: Text, Select, Radio, Radio List, Header, Description, Date, File, Checkbox. Examples are earlier on this page:
Question Type | What is it? | How to set it |
|---|---|---|
| Text | The patient inputs text | Set Questionnaire.item.item.type to "string". To set a minimum number of rows to display, create a Questionnaire.item.item.extension with url "https://fhir.zapehr.com/r4/StructureDefinitions/input-multiline-minimum-rows" and set its valuePositiveInt to the desired number of rows. |
| Select | The patient selects one of a list of options from a dropdown | Set Questionnaire.item.item.type to "choice". Then, for each option, add a { "valueString": "your_option" } to the list of Questionnaire.item.item.answerOption. |
| Radio | The patient selects one of a list of options that are all on the page, not in a dropdown | Set Questionnaire.item.item.type to "choice". Then, create a Questionnaire.item.item.extension with url "https://fhir.zapehr.com/r4/StructureDefinitions/select-type" and set its valueString to "Radio". Finally, for each option, add a { "valueString": "your_option" } to the list of Questionnaire.item.item.answerOption |
| Radio List | The patient selects one of a list of options that are all on the page, not in a dropdown. The difference between this and Radio is design | Set Questionnaire.item.item.type to "choice" . Then, create a Questionnaire.item.item.extension with url "https://fhir.zapehr.com/r4/StructureDefinitions/select-type" and set its valueString to "Radio" . Finally, for each option, add a { "valueString": "your_option" } to the list of Questionnaire.item.item.answerOption |
| Header | Header text that is displayed to the patient, the patient does not input anything | Set Questionnare.item.item.type to "display". Then, create a Questionnaire.item.item.extension with url "https://fhir.zapehr.com/r4/StructureDefinitions/text-type" and set its valueString to "h3". Finally, set Questionnaire.item.text to your desired text. |
| Description | Body text that is displayed to the patient, the patient does not input anything | Set Questionnare.item.item.type to "display". Then, create a Questionnaire.item.item.extension with url "https://fhir.zapehr.com/r4/StructureDefinitions/text-type" and set its valueString to "p". Finally, set Questionnaire.item.text to your desired text. |
| Date | The patient chooses a date | Set Questionnaire.item.item.type to "date". To prompt the user for only a year, and not a day or month, create a Questionnaire.item.item.extension with url "https://fhir.zapehr.com/r4/StructureDefinitions/date-type" and set its valueString to "year" |
| File | The patient uploads a file | Set Questionnaire.item.item.type to "attachment". To add text to the center of the upload box, create a Questionnaire.item.item.extension with url "https://fhir.zapehr.com/r4/StructureDefinitions/attachment-text" and set its valueString to the text you would like displayed. To specify the LOINC Code that identifies the type of document that the patient is uploading, create a Questionnaire.item.item.extension with url "https://fhir.zapehr.com/r4/StructureDefinitions/document-type" and set its valueString to the LOINC Code. |
| Checkbox | The patient decides weather to check or uncheck a checkbox | Set Questionnaire.item.item.type to "boolean". Then, set Questionnaire.item.item.text to the text for the checkbox. |
Question required
To make a question mandatory, set Questionnaire.item.item.required to true.
Question text width
Text Width determines how much of the horizontal space in a page a question will consume. By default, this is set to 12, the maximum value. So, for example, if you want First Name and Last Name to appear in the same line, then you would set the text-width to 6 for each of those items.
To set text-width, create a Questionnaire.item.item.extension with url "https://fhir.zapehr.com/r4/StructureDefinitions/text-width" and set its valuePositiveInt to the text width you want, between 1 and 12.
"extension": [
  {
    "url": "https://fhir.zapehr.com/r4/StructureDefinitions/text-width",
    "valuePositiveInt": 6
  }
]
Question input format
Ottehr comes with common input formats built-in, so adding them to your form is easy. If you are adding a Phone Number, Email, US State, ZIP Code, or Signature input question, you can create a Questionnaire.item.item.extension with url "https://fhir.zapehr.com/r4/StructureDefinitions/input-format" and set its valueString to "Phone Number", "Email", "State", "ZIP", or "Signature".
"extension": [
  {
    "url": "https://fhir.zapehr.com/r4/StructureDefinitions/input-format",
    "valueString": "ZIP"
  }
]
Question enableWhen
enableWhen (opens in a new tab) allows you to dynamically show questions to the patient based on their responses to other questions. enableWhen takes three inputs: question (opens in a new tab), operator (opens in a new tab), and answer (opens in a new tab). The input to question is the question ID for the question that determines this questions visibility. The input for operator is exists, =, !=, >, <, >=, or <=. And the input for answer is the value that operator compares againsed. For example, if you have the following for Questionnnaire.item.item.enableWhen:
"enableWhen": [
  {
    "question": "current-medications-yes-no",
    "operator": "=",
    "answerString": "Patient takes medication currently"
  }
]
Then this question would only appear if the patient answered "Patient takes medication currently" to the question with ID "current-medications-yes-no".
Question requireWhen
requireWhen works exactly like enableWhen, except it determines if a given question is required for patients, as opposed to visible by patients. You can have both requireWhen and enableWhen on a given question.